In today’s digital age, screen recording has become an essential tool for content creators, educators, gamers, professionals, and anyone who needs to capture what’s happening on their screen. Whether you’re making a tutorial, recording a webinar, or saving a video call, having a reliable screen recording tool is crucial. One such tool gaining popularity is iTop Screen Recorder.
But what exactly is iTop Screen Recorder, and how does it work? In this article, we’ll explore its features, how it functions, and why it’s become a favorite among users around the world.
What Is an iTop Screen Recorder?
iTop is a free screen recording software developed by iTop Inc., designed for Windows users. It allows you to capture your screen with high-quality audio and video, and it also offers additional features like video editing, webcam overlay, game recording, and more.


The software is particularly known for its user-friendly interface, which makes it accessible even to those with little technical knowledge. It’s built to serve a wide range of use cases — from recording online meetings, creating tutorials, and capturing gameplay to making reaction videos or recording streaming content.
While there is a free version, iTop also offers a Pro version with added benefits like no watermark, advanced video editing tools, hardware acceleration, and scheduled recordings.
See also: Why the Pinwheel Smartwatch is the Smart Choice for Your Child’s First Tech
Key Features of iTop Screen Recorder
Here are some standout features that make iTop Screen Recorder a popular choice:
1. Flexible Screen Capture
Users can record the full screen, a selected window, or a custom area. This flexibility allows for more control depending on the task — for example, recording a specific application or browser window instead of the entire desktop.
2. High-Quality Recording
iTop supports recording in 4K and 1080p resolution, with options to adjust frame rates and bitrates. You can also choose your preferred video format (MP4, AVI, FLV, MKV, etc.) to ensure compatibility with your editing software or media player.
3. Audio and Webcam Recording
You can capture system sound, microphone input, or both simultaneously. This is ideal for recording presentations, video tutorials, or voice-over content. The webcam overlay feature is also helpful for creating reaction videos or online classes where a face cam is needed.
4. Game Recording Mode
Gamers can benefit from a special mode optimized for recording gameplay with minimal performance impact. It supports recording DirectX and OpenGL games with high FPS, making it suitable for recording anything from indie games to graphically intense AAA titles.
5. Built-in Video Editor
Unlike many free screen recorders, iTop includes a simple video editor for trimming, cutting, and merging clips. While it’s not a full-fledged editor like Adobe Premiere or DaVinci Resolve, it’s good enough for basic post-production tasks.
6. No Watermark (Pro)
The free version includes a watermark on recordings, but upgrading to the Pro version removes it — a must-have for professional use.
7. Scheduled Recording
This feature lets users set specific times to start and stop recording automatically, perfect for webinars, live streams, or any scheduled events you might miss.
How Does an iTop Screen Recorder Work?
Getting started with iTop Screen Recorder is straightforward, even if you’ve never used screen recording software before.
Step 1: Download and Install
You can download the software directly from the official iTop website. Installation is quick and doesn’t require any complicated setup.
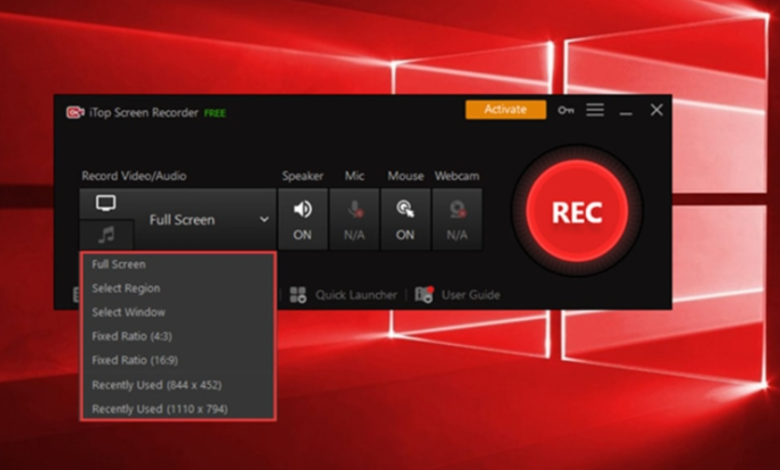
Step 2: Choose Recording Area
Once launched, you can choose to record:
- Full screen
- A specific window
- A custom region
You can also enable or disable audio and webcam inputs from the main interface.
Step 3: Adjust Settings
In the settings menu, you can:
- Choose your preferred video format
- Set video resolution and frame rate
- Select audio sources
- Customize keyboard shortcuts
- Enable GPU acceleration
These settings give you control over video quality and performance, especially useful if you’re working on a lower-end PC or want to reduce file size.
Step 4: Start Recording
Click the red REC button to begin recording. A floating toolbar appears, allowing you to pause, stop, or take screenshots during recording.
Step 5: Edit and Save
After stopping the recording, the file appears in the video manager. You can preview the video, make quick edits, or export it directly. Videos can be shared or uploaded to platforms like YouTube, Google Drive, or Dropbox.
Use Cases for iTop Screen Recorder
Here are some common ways people use iTop screen recorder:
- Education: Teachers recording online lectures or tutorials
- Business: Recording video calls, presentations, or product demos
- Gaming: Creating gameplay walkthroughs or reviews
- Content Creation: Making YouTube videos, TikToks, or social media content
- Troubleshooting: Showing tech support exactly what’s going wrong
Its versatility makes it a solid choice for both personal and professional use.
Final Thoughts
iTop Screen Recorder is a powerful, lightweight, and easy-to-use screen recording tool that caters to a wide range of users. With its blend of high-quality output, built-in editing tools, and user-friendly interface, it’s easy to see why it’s a favorite among content creators and professionals alike.
Whether you need to record a lecture, capture gameplay, or produce tutorial videos, iTop Screen Recorder offers a reliable solution — and with the free version available, it’s worth giving it a try.